Pico Glitcher v2
A device to perform fault-injection attacks
I am selling the PicoGlitcher on faultyhardware.de.
More links:
- The Pico Glitcher and findus (the software to control the Pico Glitcher) are open source: fault-injection-library
- Documentation of the Pico Glitcher and findus: fault-injection-library.readthedocs.io
- hackaday.io project page: hackaday.io/project/196357-picoglitcher
- The Pico Glitcher was featured on Hackaday: hackaday.com/2024/10/30/use-picoglitcher-for-voltage-glitching-attacks/
If you have feature requests or issues, please contact me:
- twitter: @BartimaeusvUruk
- mastodon: @mkesenheimer@mastodon.social
- discord: https://discord.gg/8mqEVPG6k7
Compared to hardware revision 1, several new features have been added in revision 2. However, the basic usage is the same and the scripts for version 1 will also (likely) work for version 2.

The hardware is based on the Raspberry Pi Pico, two high-power MOSFETs for crowbar glitch generation, and two level shifters to ensure compatibility over a wide voltage range. A newly designed input stage (EXT1 and EXT2) can be used to filter out noise and other disturbances via adjustable Schmitt Triggers. The multiplexing output can be used to quickly switch between up to four different voltage levels and to supply the target board with power.
The second revision of the Pico Glitcher can also be modified to suit your needs. The Pico Glitcher v2 is built from the following components:
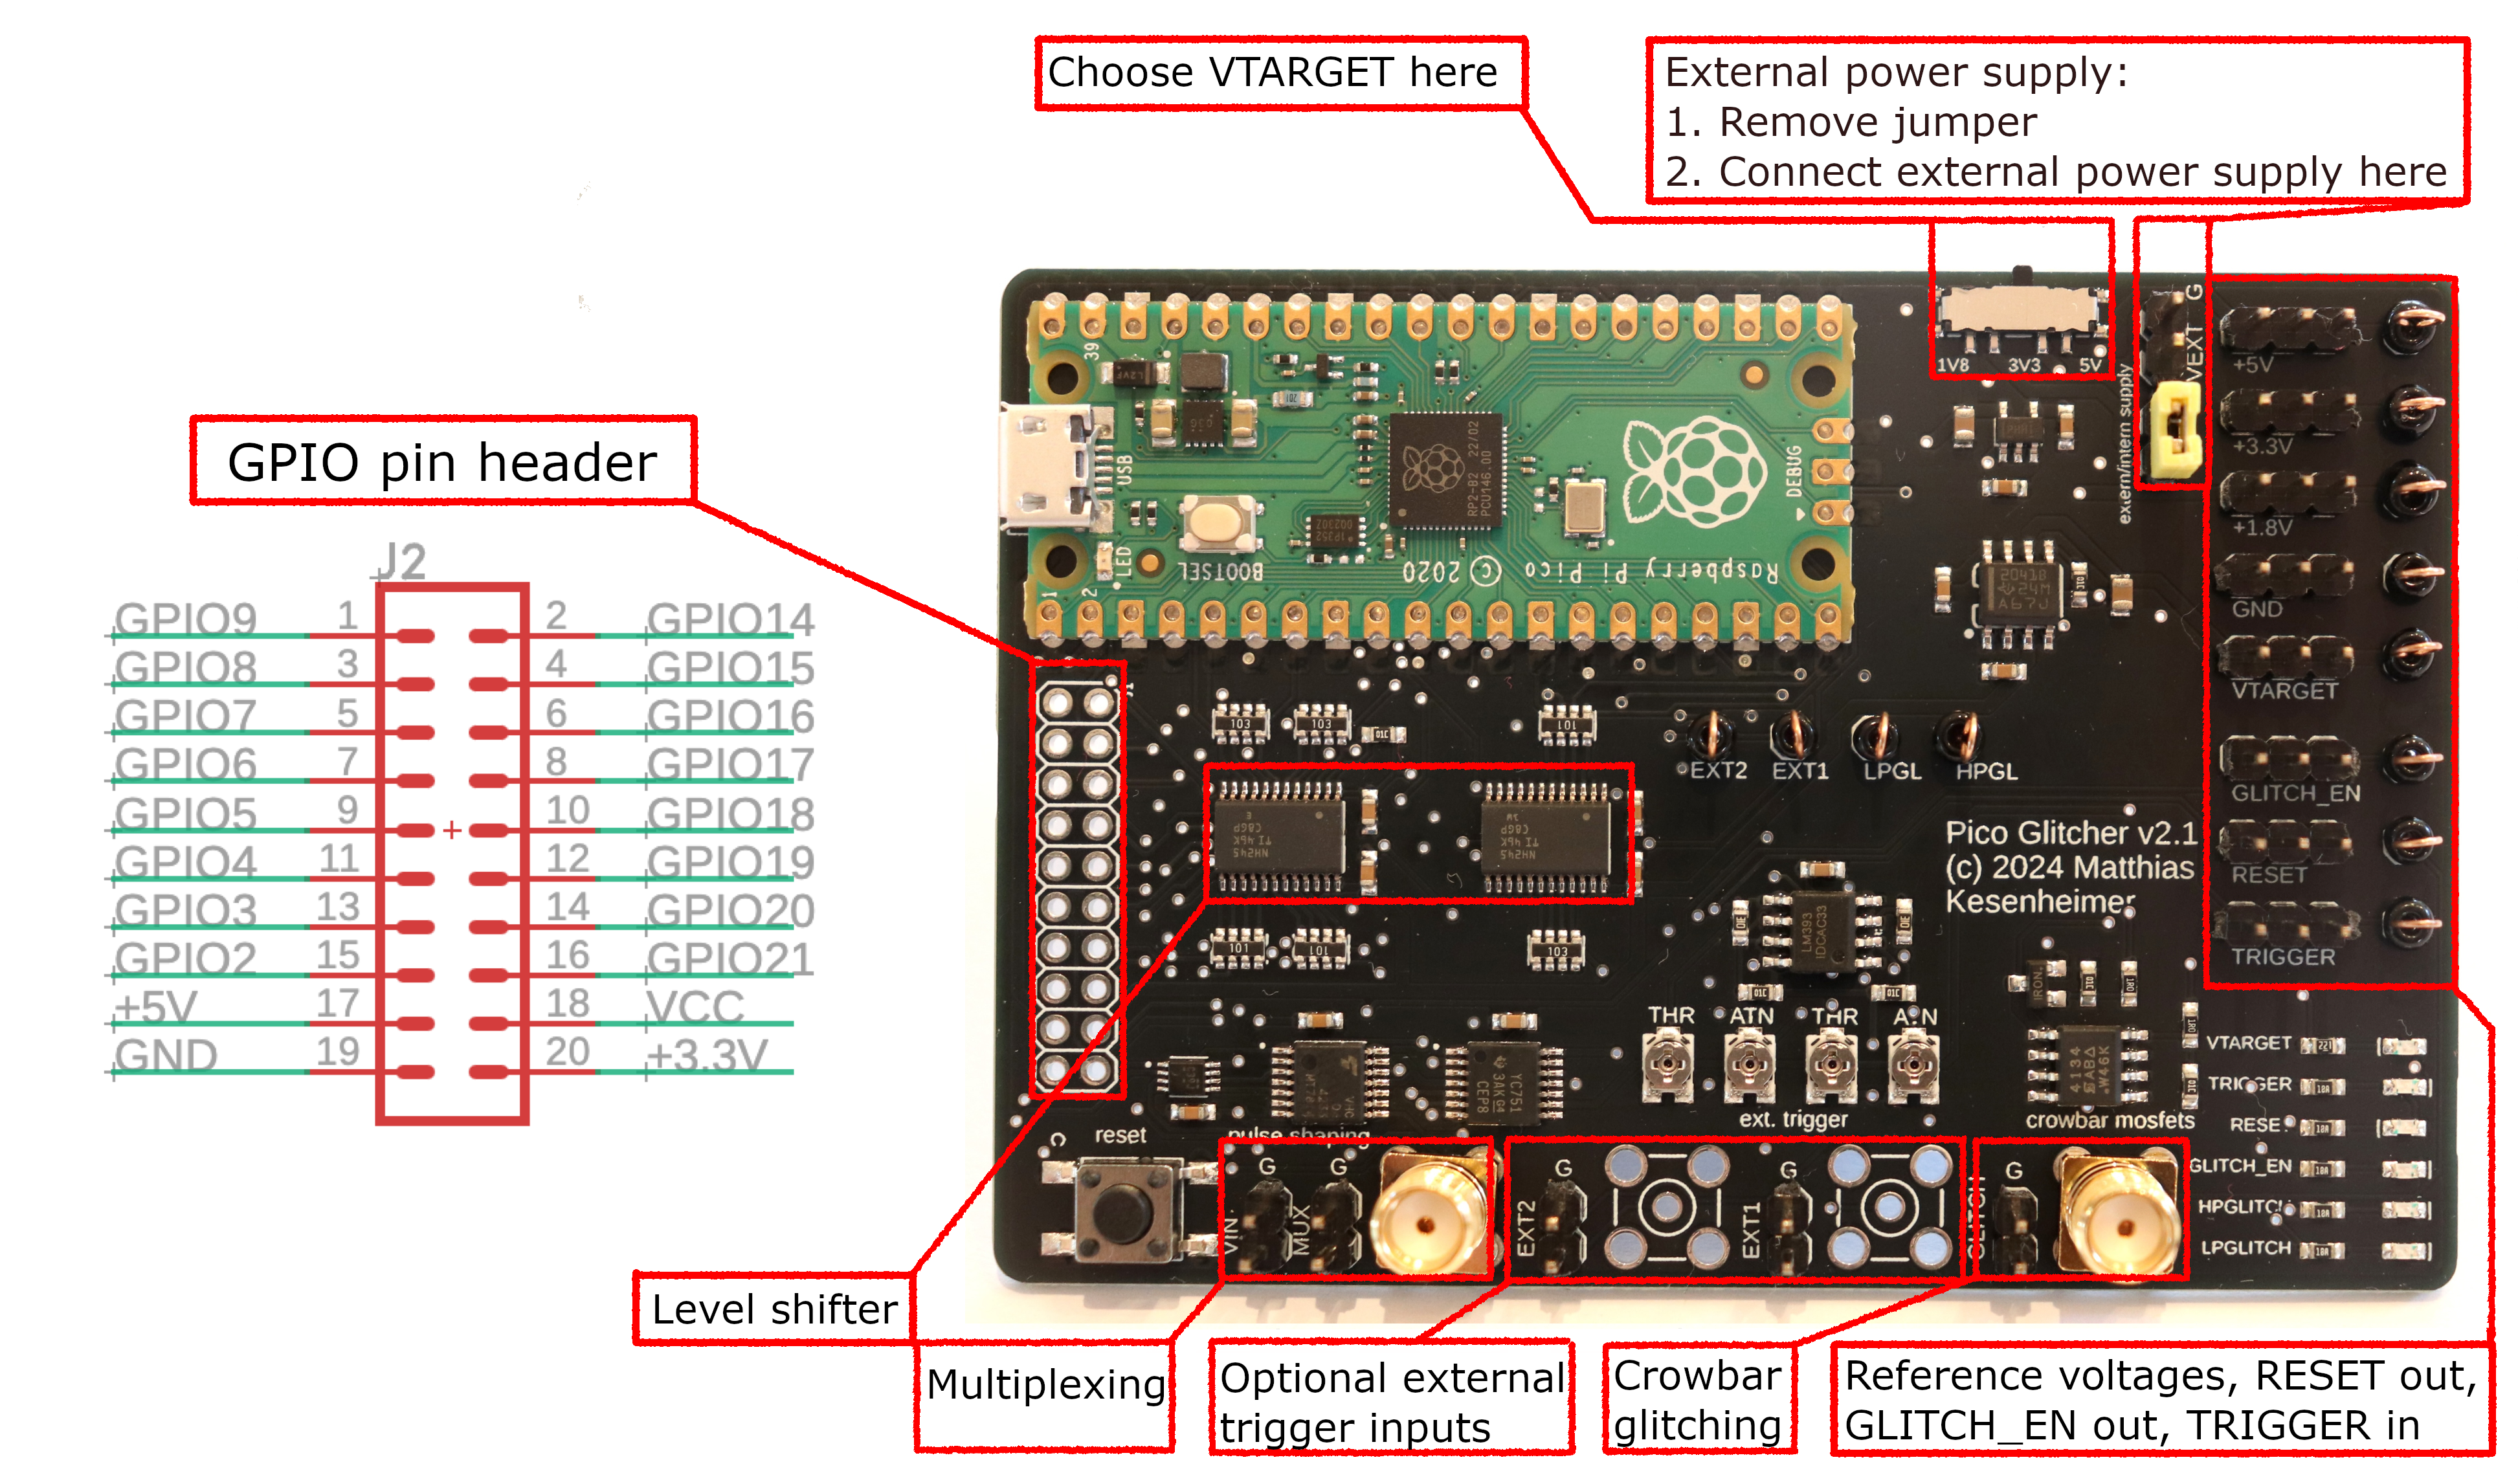
If you want to write code for additional communication protocols, such as a UART-to-USB adapter, or an SPI-to-USB adapter, then the unused GPIO pins are perfect for that. Pins GPIO16 - GPIO19 are connected to the Raspberry Pi Pico without a level shifter and can be used bi-directionally. The output pins with level-shifting are GPIO4 - GPIO9. For inputs with level shifter the pins GPIO15, GPIO20 and GPIO21 can be used.
Multiplexing
Multiplexing is a technique to quickly switch between different supply voltage levels of the microcontroller. Similar to glitching with the crowbar technique, this can cause a fault in the microcontroller. A fundamental difference is that with the multiplexing-fault-injection method, the supply voltage of the microcontroller is not pulled to GND, but intermediate voltages can also be used, for example 1.8V or user-defined voltages. It is also possible to go through a sequence of different supply voltages, so called voltage profiles.
With the second hardware revision of the Pico Glitcher, it is possible to create different voltage profiles and apply them to the supply voltage of the target. This is made possible by the introduction of the multiplexing stage. The multiplexing stage also allows the target to be supplied with power. It is therefore not necessary to additionally supply the target with voltage via the 'VTARGET' output.
The following setup can be used to test the multiplexing stage of the Pico Glitcher v2:
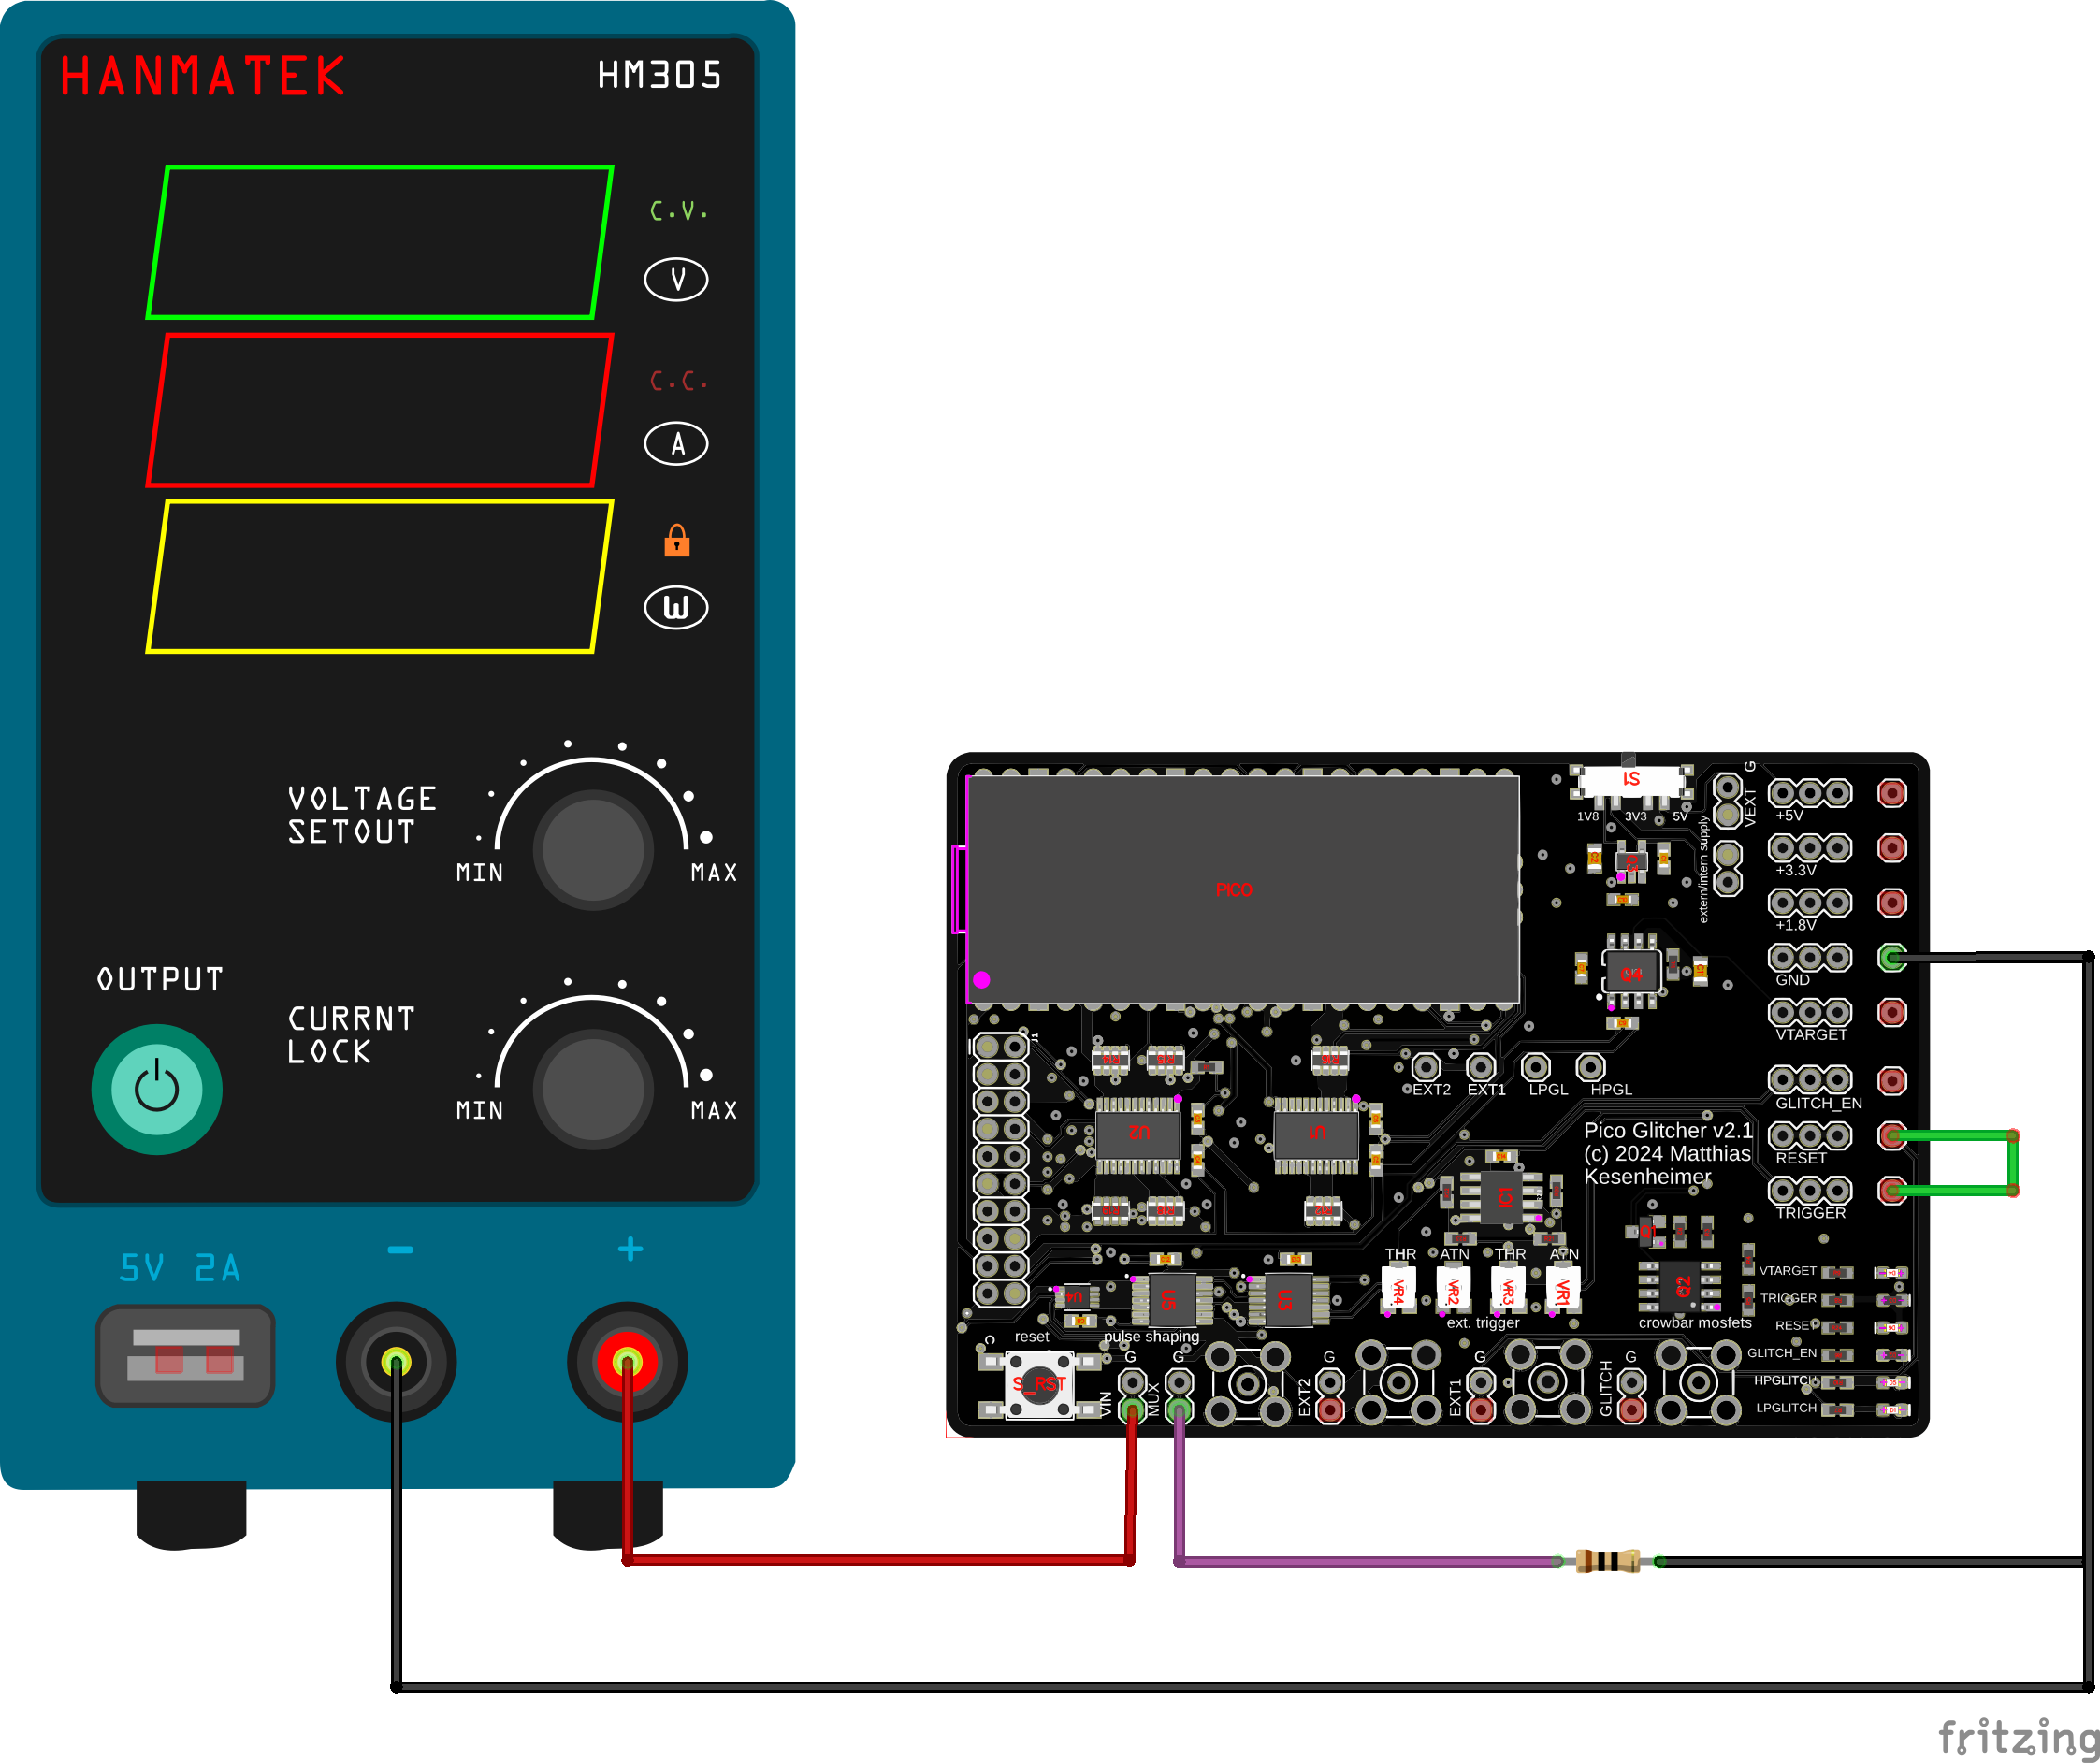
Note that the power supply is optional and can be used to generate a third, intermediate voltage. Without the additional power supply, the multiplexing stage of the Pico Glitcher can switch between 3.3V, 1.8V and 0V. See fault-injection-library/example/pico-glitcher.py for a complete test script and fault-injection-library.readthedocs.io for a detailed overview on how to setup and use the multiplexing stage.
The software for controlling the multiplexing stage is extremely flexible and a vast number of voltage profiles with countless parameterizations can be generated. Up to four different voltage steps can be parametrized and utilized with the general multiplexing configuration similar to
mul_config = {"t1": t1, "v1": "GND", "t2": t2, "v2": "1.8", "t3": t3, "v3": "VCC", "t4": t4, "v4": "3.3"}
where VCC is a user-supplied voltage level by the VIN input. Below are some examples of voltage traces that can be applied to the target.
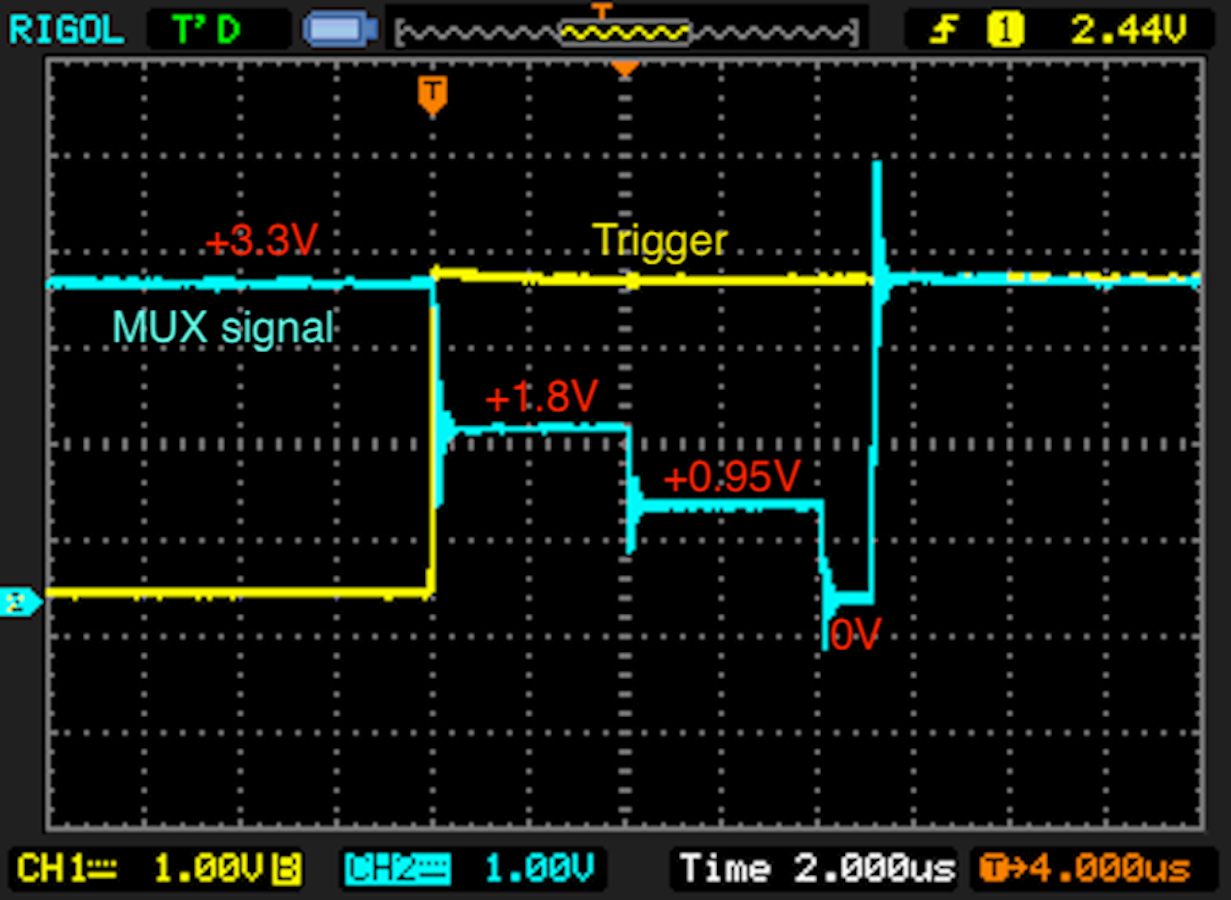
- 1.8V voltage step, custom voltage of 0.95V, followed by a pull to GND:
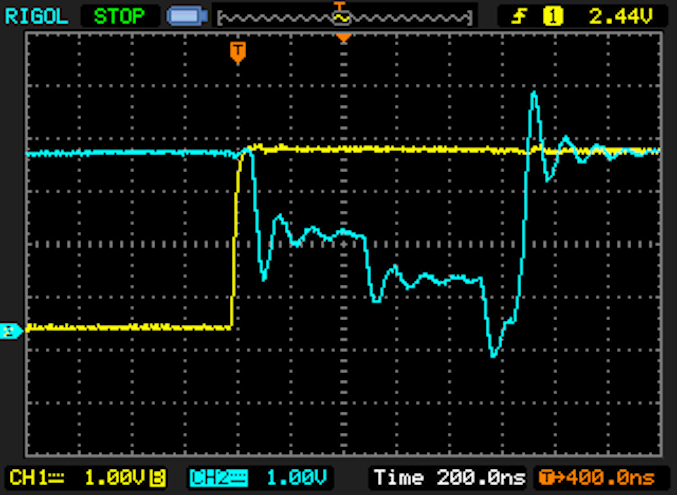
- The same pulse, but a factor 10 shorter:
- Double glitch (both to GND), separated by 400ns:
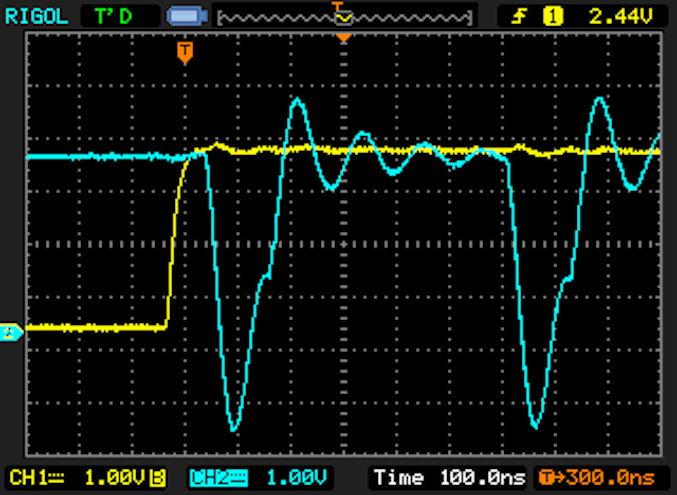
In order to switch quickly between different voltage levels, the chip 'TS3A4751' from Texas Instruments is used. This chip is a 4-channel analog switch in SPST (single-pull-single-through) configuration. To make the analog switch easier to control and to reduce the signal lines from the Raspberry Pi Pico to the analog switch, a digital demultiplexer is used ('SN74LVC1G139DCUT'). Since the voltage levels are reversed after the demultiplexer, a 4-channel not-gate is used to reverse the voltage levels.
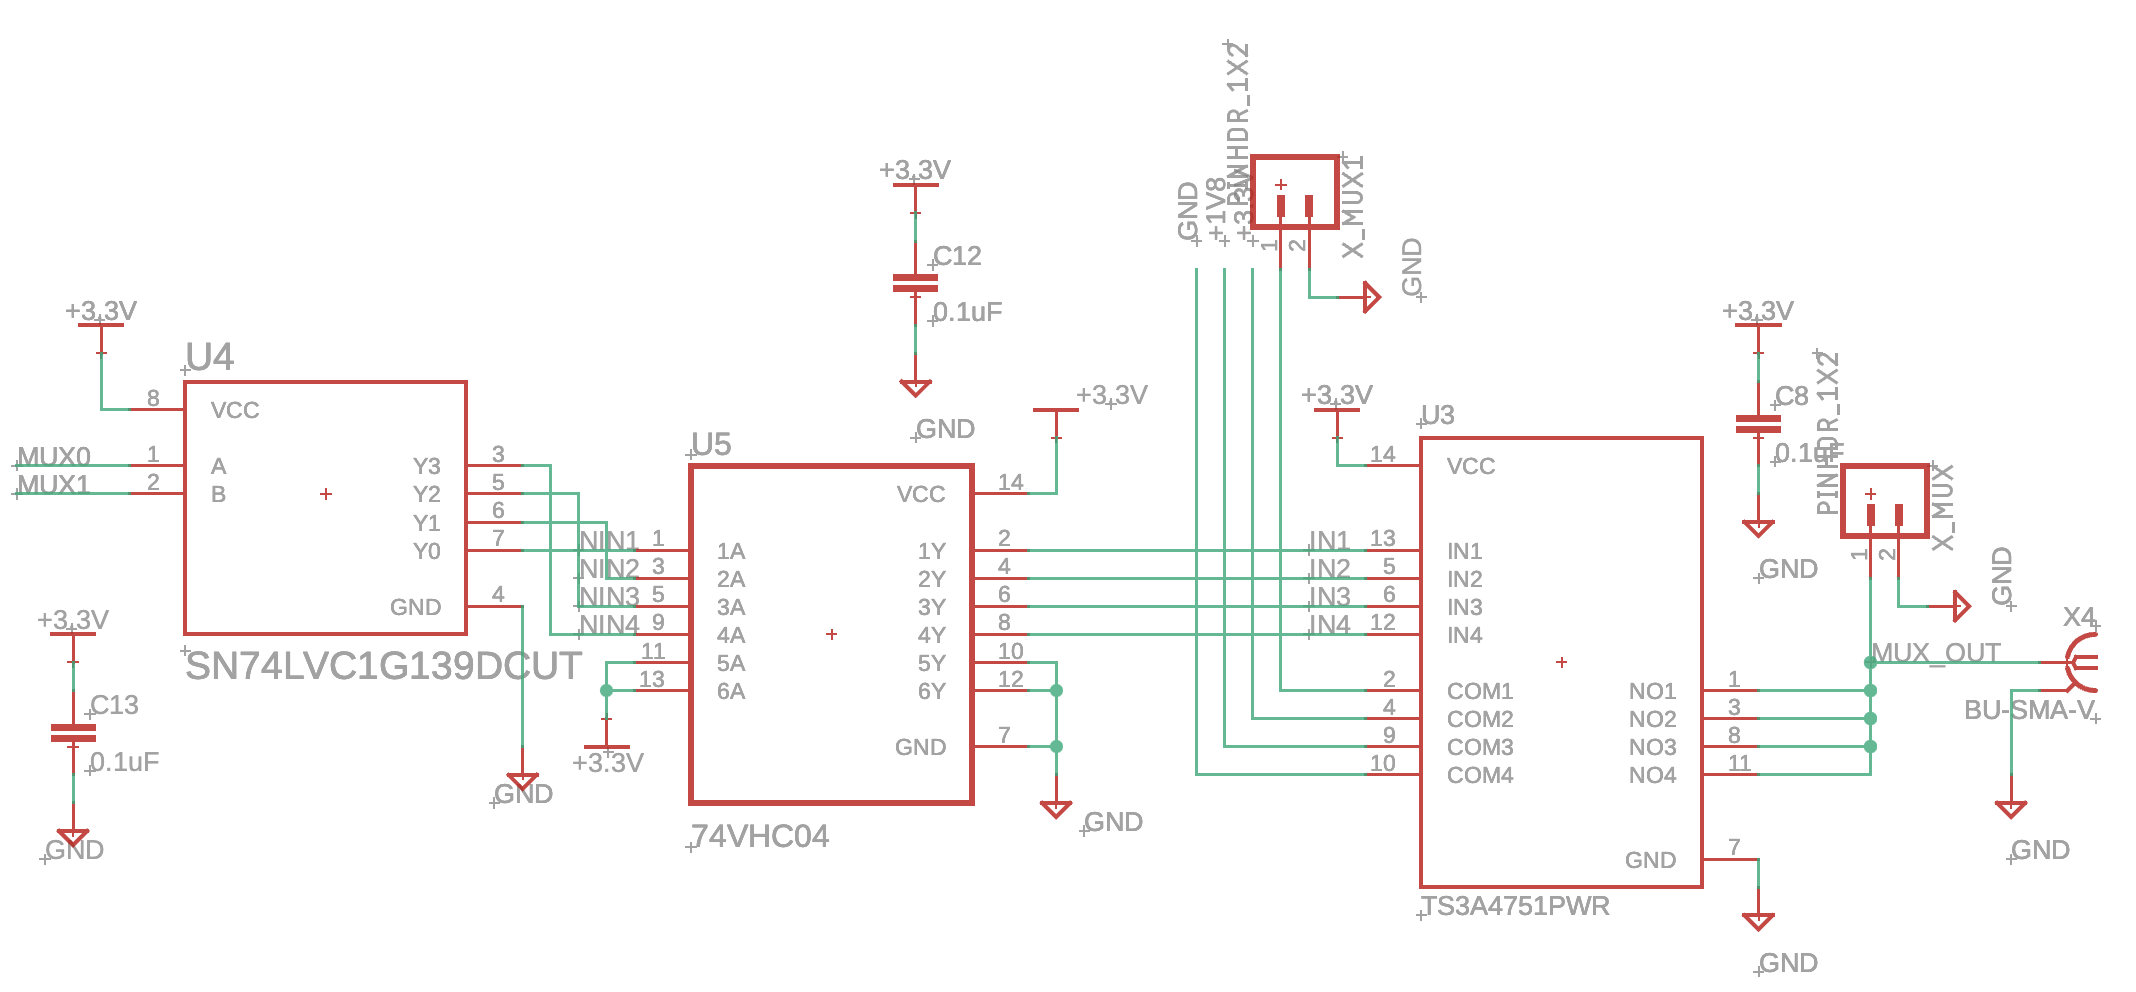
This setup seems rather complicated to switch between four different voltage levels. However, the choice of analogue switches is not exactly extensive or does not match the requirements of a fast-switching fault-injection device. The required properties of the analogue switch are as follows:
- Fast switching: less than 5ns switching time.
- Number of channels: four channels for flexible switching between as many voltage levels as possible.
- Low resistance: to avoid switching losses, a low resistance of 1Ω or less is required.
- High output current: a high continuous current of at least 100mA is needed to keep the device powered even for a long time. This maximum current should be suitable for most microcontrollers.
All these requirements are met by the 'TS3A4751', even if the choice of this chip has made controlling it a little more complicated.
Schmitt Trigger inputs
The trigger inputs EXT1 and EXT2 are particularly useful for noisy logic signals, as the noise can be easily suppressed by the adjustable Schmitt Trigger. If, for example, the signal oscillates or is disturbed in any other way, this disturbances can be cut off by selecting a suitable threshold.
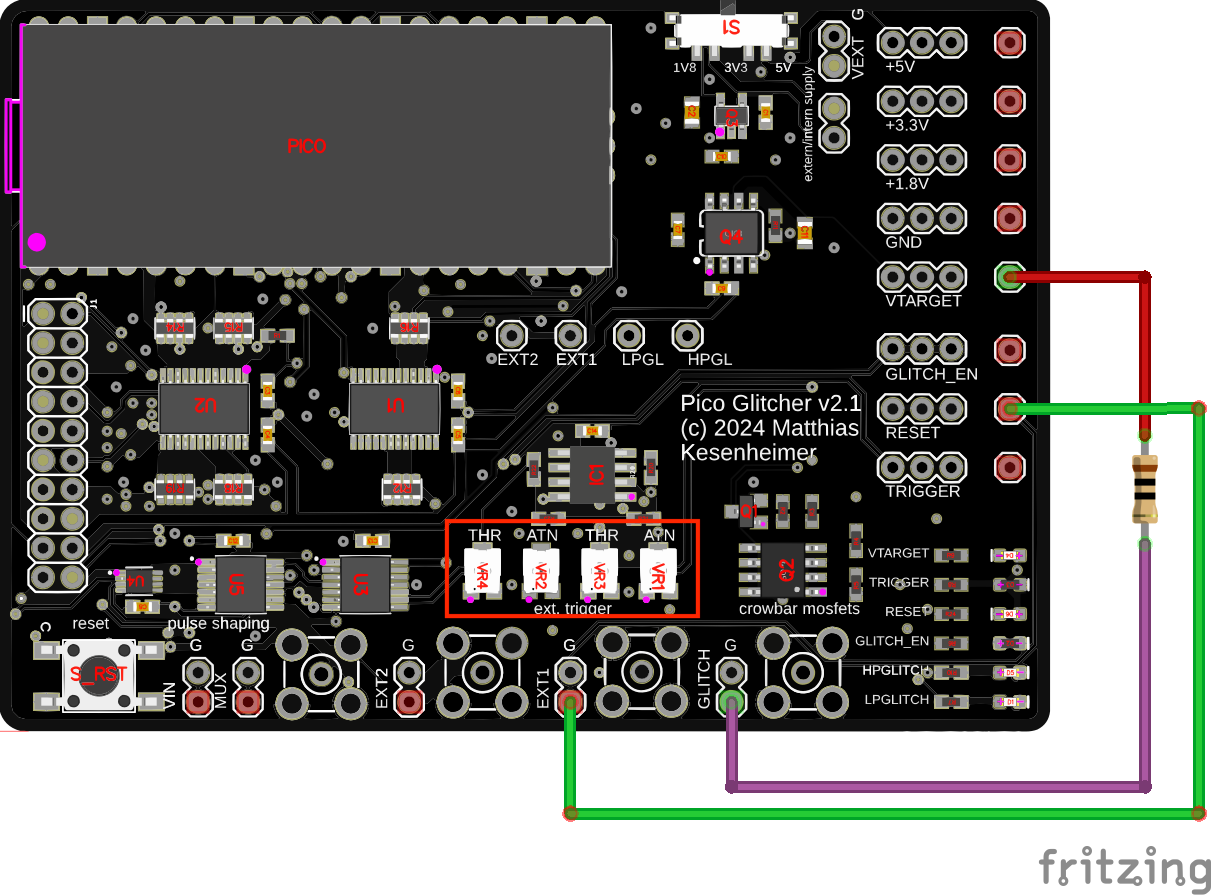
Use the potentiometer labeled THR to adjust the threshold of the Schmitt Trigger. The threshold is lowered by turning the potentiometer to the left.
The potentiometer ATN can be used for an additionally signal reduction, if necessary. Turning the potentiometer all the way to the right disables attenuation and uses the full signal range.
Continue reading
Continue reading about the Pico Glitcher and its capabilities, or how to attack various microcontrollers, here:
- The beginning of the Pico Glitcher
- The Pico Glitcher v2
- The Pico Glitcher v3
- Voltage multiplexing and parameter optimization
- Attacking the STM32F4 with the PicoGlitcher
- Attacking the Trezor One Crypto Wallet (new firmware)
- Glitching the Raspberry Pico with a Raspberry Pico
- Attacking the SMT32L051 with the Pico Glitcher
- Attacking the nRF54L15 with an Electromagnetic Fault Injection (EMFI) attack and the Pico Glitcher
- Voltage Glitching with the Pico Glitcher and Findus
- The Pico Glitcher on Youtube